HowTo Build and Run ChaNGa over Charm++ using UCX/MPI Machine layer
This post will walk you through the procedure to build and test ChaNGa over Charm++ using UCX, or Open MPI/Intel MPI machine layers over InfiniBand Interconnect and Intel architecture (Skylake).
References
- ChaNGa on Github
- Charm++ on Github
- ChaNGa Benchmarks
- HDR InfiniBand and Dual rail support for HPC-X/UCX
Overview
ChaNGa (CHArm++ N-body GrAvity solver) is a Cosmological simulation framework originally called "N-Chilada", it is a collaborative project with Prof. Thomas Quinn (University of Washington: N-Body Shop) supported by the NSF.
ChaNGa was built as a Charm++ application that employs a tree algorithm to represent the simulation space. This tree is constructed globally over all particles in the simulation and segmented into elements named TreePieces. The various TreePieces are distributed by the Charm++ runtime system to the available processors for parallel computation of the gravitational forces. Each TreePiece is implemented in ChaNGa as a chare and can migrate between processors (e.g. during load balancing) as the simulation evolves. Because various TreePieces may reside on the same processor, ChaNGa employs a software caching mechanism that accelerates repeated accesses to the same remote particle data. Each processor contains a cache, implemented as a Charm++ group, to store remotely fetched TreePieces. Another important feature in ChaNGa is the use of a multi-step integration scheme, which on the smallest (most frequent) timestep updates only those particles with the highest speeds. To read mode about ChaNGa see here.
Prerequisites
- Before you start, make sure you have access to HPC environment, clustering function, slurm and networking.
- For UCX or OpenMPI (HPC-X) make sure to have UCX/OMPI modules in your environment. In this post we are using intel compiler, and HPC-X MPI (UCX, OpenMPI) and MKL.
$ module list
Currently Loaded Modulefiles:
  1) intel/2018.5.274   2) hpcx/2.4.0         3) mkl/2018.5.274
In case HPC-X is not available in your environment, you can simply compile UCX from openucx git.
Follow the instructions, here.
$ git clone https://github.com/openucx/ucx.git
...
$ cd ucx
$ ./autogen.sh
...
$ ./contrib/configure-release --prefix=/where/to/install
...

$ make -j8
...
$ make install
...
In case you
For Intel MPI you will need to use Intel MPI module.
$ module list
Currently Loaded Modulefiles:
  1) intel/2018.5.274   2) impi/2018.4.274    3) mkl/2018.5.274
Obtaining ChaNGa and Charm++
Get the the latest version of charm++ and ChaNGa, including the utility git.
$ git clone https://github.com/UIUC-PPL/charm.git
...
$ git clone https://github.com/N-BodyShop/changa.git
...
$ git clone https://charm.cs.illinois.edu/gerrit/cosmo/utility.git
...
$ ls
changa charm utility
Enter Charm directory
$ cd charm
Build Charm++ with ChaNGa supported libraries
Charm++ has few build options, including several options for machine layer to be used.
- Add ChaNGa to the build arguments to include the relevant supported libraries.
- You may add also --enable-error-checking and --with-production flags.
- If you are using intel compilers add icc and ifort to the build arguments, otherwise, it will use gcc.
Here are two examples for machine layer builds: UCX and MPI. you will need one of them.
UCX Machine Layer
1. To build with UCX make sure OpenUCX or HPC-X modules are loaded in your environment.
$ module list
Currently Loaded Modulefiles:
  1) intel/2018.5.274   2) hpcx/2.4.0         3) mkl/2018.5.274
2. In order to build UCX machine layer, use the ucx-linux-x86_64 and add the ompipmix flag for messaging.
Note: slurmpmi and slurmpmi2 are not fully debugged.
After the build, look for the successfully.
$ ./build ChaNGa ucx-linux-x86_64 ompipmix icc ifort --enable-error-checking --with-production -j16

...
ChaNGa built successfully.
Next, try out a sample program like ucx-linux-x86_64-ifort-ompipmix-icc/tests/charm++/simplearrayhello
Note: In case you are using OpenUCX, you need to include the CPATH and the LIBRARY_PATH parameters in your environment.
$ CPATH=/where/ucx/was/installed/include LIBRARY_PATH=/where/ucx/was/installed/lib ./build ChaNGa ucx-linux-x86_64 ompipmix icc ifort --enable-error-checking --with-production -j16
and before running, make sure to pre-load the library path as well.
$ LD_LIBRARY_PATH=/where/ucx/was/installed/lib:$LD_LIBRARY_PATH ./charmrun ...
MPI Machine Layer (OpenMPI/HPC-X )
1. To build with OpenMPI/HPC-X make sure HPC-X modules are loaded in your environment.
$ module list
Currently Loaded Modulefiles:
  1) intel/2018.5.274   2) hpcx/2.4.0         3) mkl/2018.5.274
2. In order to build MPI machine layer, use the mpi-linux-x86_64.
After the build, look for the successfully.
$ ./build ChaNGa mpi-linux-x86_64 icc ifort --enable-error-checking --with-production -j16
...
ChaNGa built successfully.
Next, try out a sample program like mpi-linux-x86_64-ifort-icc/tests/charm++/simplearrayhello
MPI Machine Layer (Intel MPI)
1. To build with Intel MPI, make sure Intel MPI modules are loaded in your environment.
$ module list
Currently Loaded Modulefiles:
  1) intel/2018.5.274   2) impi/2018.4.274    3) mkl/2018.5.274
2. In order to build MPI machine layer, use the mpi-linux-x86_64.
After the build, look for the successfully.
$ ./build ChaNGa mpi-linux-x86_64 icc ifort --enable-error-checking --with-production -j16
...
ChaNGa built successfully.
Next, try out a sample program like mpi-linux-x86_64-ifort-icc/tests/charm++/simplearrayhello
Testing Charm
It is recommended to run simple multi-node test to verify charm is not broken.
Simple Hello Test
Simple hello test is available under <machine layer>/tests/charm++/simplearrayhello
$ cd ucx-linux-x86_64-ifort-ompipmix-icc/tests/charm++/simplearrayhello
$ make
...
Allocate few nodes using slurm and test. In this example, we are using 4 nodes from Helios cluster.
$ salloc -N 4 -p helios
salloc: Granted job allocation 32627
Use charmrun with the following arguments
- +p : number of processes (In our example, each node is 40 cores, total of 160)
- first argument of hello test is the number of elements in the char array, in this example we just selected 1600 (more than the number of processors).
$ ./charmrun +p 160 ./hello 1600
....
[159] Hi[1614] from element 1597
[159] Hi[1615] from element 1598
[159] Hi[1616] from element 1599
All done
[Partition 0][Node 0] End of program
Mega Test
Mega test is more compete test. It is available under <machine layer>/tests/charm++/megatest
$ cd ../megatest
$ make -j8
Similarly,
- +p : number of processes (In our example, each node is 40 cores, total of 160)
- use the pgm executable.
Run:
$ ./charmrun +p 160 ./pgm
...
test 51: initiated [multi callback (olawlor)]
test 51: completed (0.01 sec)
test 52: initiated [all-at-once]
Starting test
Created detector, starting first detection
Started first test
Finished second test
Started third test
test 52: completed (0.40 sec)
All tests completed, exiting
Now after successful build and test of charm++ you are ready for ChaNGa build.
Build ChaNGa
Note: if you compile several times with different charm++ builds, make sure to clean the old compilations to leave no tracks.
$ make dist-clean
...
Configure,
$ CHARMC=$PWD/../charm/mpi-linux-x86_64-ifort-icc/bin/charmc CC=icc CXX=icpc FC=ifort ./configure
Build,
$ make -j16
Look for the ChaNGa executable after successful build.
Testing ChaNGa
Several benchmarks are available in ChaNGa Benchmarks
In this example, we will use small dwarf star dwf1 (dwf1.2048.param and dwf1.2048.00384) is a 5 million particle zoom-in simulation. It is cosmological, but the particle sampling focuses on a single halo of roughly 1e11 solar masses. This is a dark matter only version of the DWF1 model that demonstrates how disk galaxies can form in a cosmological context.
To test ChaNGa, download dwf files into ChaNGa directory (where the executable is).
$ ls dwf1.2048.*
dwf1.2048.00384  dwf1.2048.param
Allocate nodes (if you released it already) and test.
$ ./charmrun +p160 ./ChaNGa ./dwf1.2048.param

WARNING: bStandard parameter ignored; Output is always standard.
ChaNGa version 3.3, commit v3.3-409-g3e753c5
Running on 160 processors/ 160 nodes with 1280 TreePieces
...
Step: 10.000000 Time: 0.250112 Rungs 0 to 0. Gravity Active: 4976448, Gas Active: 0
Domain decomposition ... total 0.0175694 seconds.
Load balancer ... Orb3dLB_notopo: Step 10
numActiveObjects: 1280, numInactiveObjects: 0
active PROC range: 0 to 159
Migrating all: numActiveObjects: 1280, numInactiveObjects: 0
[Orb3dLB_notopo] sorting
***************************
Orb3dLB_notopo stats: maxObjLoad 0.437553
Orb3dLB_notopo stats: minWall 2.611815 maxWall 2.622255 avgWall 2.620342 maxWall/avgWall 1.000730
Orb3dLB_notopo stats: minIdle 0.095989 maxIdle 0.626851 avgIdle 0.344770 minIdle/avgIdle 0.278414
Orb3dLB_notopo stats: minPred 1.906177 maxPred 2.416297 avgPred 2.163108 maxPred/avgPred 1.117049
Orb3dLB_notopo stats: minPiece 6.000000 maxPiece 12.000000 avgPiece 8.000000 maxPiece/avgPiece 1.500000
Orb3dLB_notopo stats: minBg 0.041036 maxBg 0.329045 avgBg 0.103276 maxBg/avgBg 3.186074
Orb3dLB_notopo stats: orb migrated 199 refine migrated 0 objects
took 0.0173379 seconds.
Building trees ... took 0.0182456 seconds.
Calculating gravity (tree bucket, theta = 0.700000) ... Calculating gravity and SPH took 2.55769 seconds.
Big step 10 took 2.683016 seconds.
[0] Checkpoint starting in dwf1.2048.bench.chk0
Checkpoint to disk finished in 6.612624s, sending out the cb...
Done.

******************

[Partition 0][Node 0] End of program
To calculate the elapsed for 10 Big Steps you can add awk scripting as follows:
$ ./charmrun +p160 ./ChaNGa ./dwf1.2048.param | grep Big | awk '{ SUM += $5} END { print "BigStepTime=" SUM }'
WARNING: bStandard parameter ignored; Output is always standard.
ChaNGa version 3.3, commit v3.3-409-g3e753c5
Running on 160 processors/ 160 nodes with 1280 TreePieces
BigStepTime=32.0763
HDR InfiniBand Consideration (Dual rail)
HDR InfiniBand can come with both single rail using PCI gen4 x16 or Dual rail using 2x PCI gen3 x16.
In case dual rail is used (2x PCI gen3 x16), HPC-X OpenMPI or UCX should receive the interfaces to be used.
HPC-X/UCX
Add the relevant devices on the command line for example -x UCX_NET_DEVICES=mlx5_0:1,mlx5_2:1. Fore more details see HDR InfiniBand and Dual rail support for HPC-X/UCX.
Full command line should look like:
$ ./charmrun +p160 -x UCX_NET_DEVICES=mlx5_0:1,mlx5_2:1  ./ChaNGa ./dwf1.2048.param | grep Big | awk '{ SUM += $5} END { print "BigStepTime=" SUM }'
...
ChaNGa version 3.3, commit v3.3-409-g3e753c5
Running on 160 processors/ 160 nodes with 1280 TreePieces
BigStepTime=29.9195
Intel MPI
Intel MPI 2018 supports dual rail by default (on DAPL). to verify that add the -genv I_MPI_DEBUG=5 and run to check the used devices.
To force Intel MPI use one device (HDR100), use the flag -genv I_MPI_DAPL_PROVIDER ofa-v2-mlx5_0-1 with the relevant device. for more info, see HDR InfiniBand and Dual rail support for Intel MPI.
Debugging
1. To debug intel MPI use -genv I_MPI_DEBUG=5
For example:
$ ./charmrun +p160 -genv I_MPI_DEBUG=5 ./ChaNGa ./dwf1.2048.param
...
Input Files
Make sure that the input files are located in the same director of the ChaNGa executable.
ls /global/software/centos-7/sources/changa/input-files/
dwf1.2048.00384  dwf1.2048.param  dwf1.6144.01472  dwf1.6144.param
Tuning
1. For AVX support configure ChaNGa with --enable-sse2
2. Run ChaNGa executable with number larger than 12 (e.g. -b 24)
Additional tuning option
1. You may want to try Charm SMP option (one core is used for the SMP process per node)
- Need to build charm++ with SMP support, with “smp” after icc (for example)
- Rebuild ChaNGa
- ChaNGa tell it how many worker threads to have (e.g. ++ppn 39)
- For charmrun use one less core per node, e.g. use +p 156 for 4 nodes.
2. Use different -p number
- ChaNGa -p 2048 (default is 8 virtual processes per real based on the +p parameter that you use).
e.g if +p is 160, -p default is 160*8 (higher can be tested) but not more than the number of particles divided by 10 (e.g. 5M -> 5000 is the max)
Performance Benchmarking
The following benchmarks were tested on Helios cluster using HDR100 network for up to 32 nodes.
Testing Details
ChaNGa over Charm++ Machine Layers (ML)
- UCX (http://www.openucx.org)
- Intel MPI 2018
Input files
- dwf (dwf1.2048) is a 5 million particle zoom-in simulation. It is cosmological, but the particle sampling focuses on a single halo of roughly 1e11 solar masses
- dwf (dwf1.6144) is a 50 million particle zoom-in simulation
Download the input files here.
Output Measurement
- Sum of 10 BigSteps (elapsed)
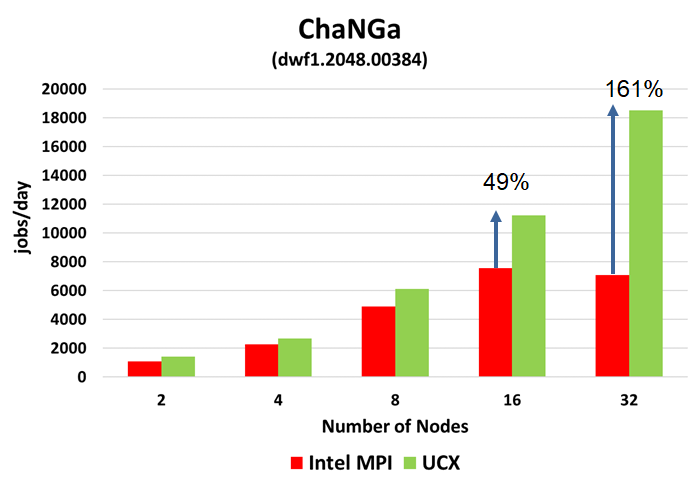
Out of the Box Performance
In this example we compared two charm++ builds:
- UCX machine layer using the following build.
- ./build ChaNGa ucx-linux-x86_64 ompipmix icc ifort --enable-error-checking --with-production -j16
- MPI machine layer based on Intel MPI 2018
- $ ./build ChaNGa mpi-linux-x86_64 icc ifort --enable-error-checking --with-production -j16
No special tuning was done, see above for full build instructions.
Results
- ChaNGa using UCX Machine layer provides 49% higher performance at 16 nodes.
- In addition, UCX Machine layer provides 161% higher performance at 32 nodes
- Performance reduction demonstrated with Intel MPI beyond of 16 nodes
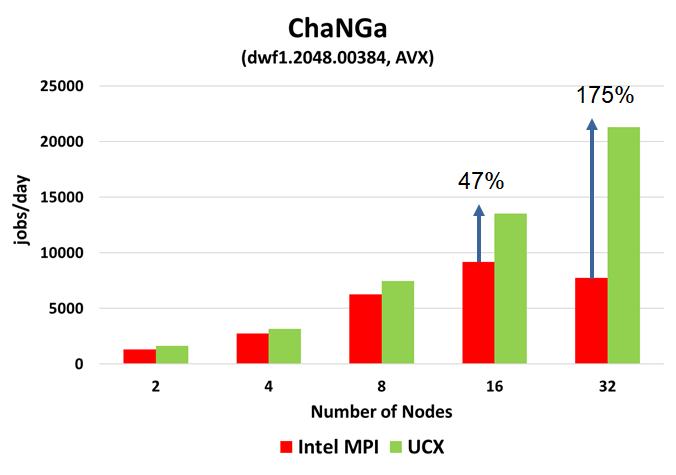
AVX enabled Performance
As Intel Skylake servers supports AVX, we changed the build to enable it.
In this example we compared two charm++ builds:
- UCX machine layer using the following build.
- ./build ChaNGa ucx-linux-x86_64 ompipmix icc ifort --enable-sse2 --enable-error-checking --with-production -j16
- MPI machine layer based on Intel MPI 2018
- $ ./build ChaNGa mpi-linux-x86_64 icc ifort --enable-sse2 --enable-error-checking --with-production -j16
No additional tuning was done, see above for full build instructions.
Results
- Similarly, ChaNGa using UCX Machine layer provides 47% higher performance at 16 nodes.
- In addition, UCX Machine layer provides 175% higher performance at 32 nodes
- Performance reduction demonstrated with Intel MPI beyond of 16 nodes
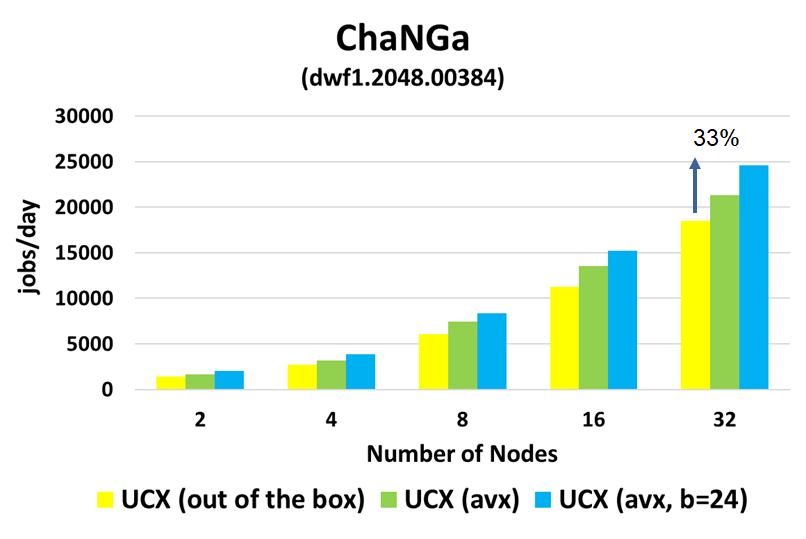
AVX enabled Performance plus Particles per Bucket Tuning
As Intel Skylake servers supports AVX, we changed the build to enable it.
In addition, runtime tuning was done to allow larger pacticles per bucket (using the -b argument). The default is 12, we enlarged it to 24 in this example.
In this example we compared two charm++ builds:
- UCX machine layer using the following build.
- ./build ChaNGa ucx-linux-x86_64 ompipmix icc ifort --enable-sse2 --enable-error-checking --with-production -j16
- MPI machine layer based on Intel MPI 2018
- $ ./build ChaNGa mpi-linux-x86_64 icc ifort --enable-sse2 --enable-error-checking --with-production -j16
Run command:
./charmrun +p160 -x UCX_NET_DEVICES=mlx5_0:1 ./ChaNGa -b 24 ./dwf1.2048.param | grep Big | awk '{ SUM += $5} END { print "BigStepTime=" SUM }'
No additional tuning was done, see above for full build instructions.
Results
- Similarly, ChaNGa using UCX Machine layer provides 49% higher performance at 16 nodes.
- In addition, UCX Machine layer provides 171% higher performance at 32 nodes
- Performance reduction demonstrated with Intel MPI beyond of 16 nodes
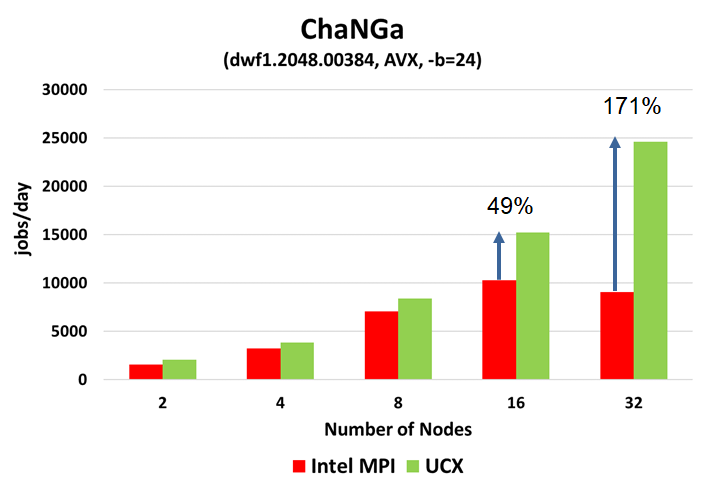
Performance gain using ChaNGa with UCX machine layer and Tuning
33% of performance gained due to AVX and Particles per Bucket Tuning.
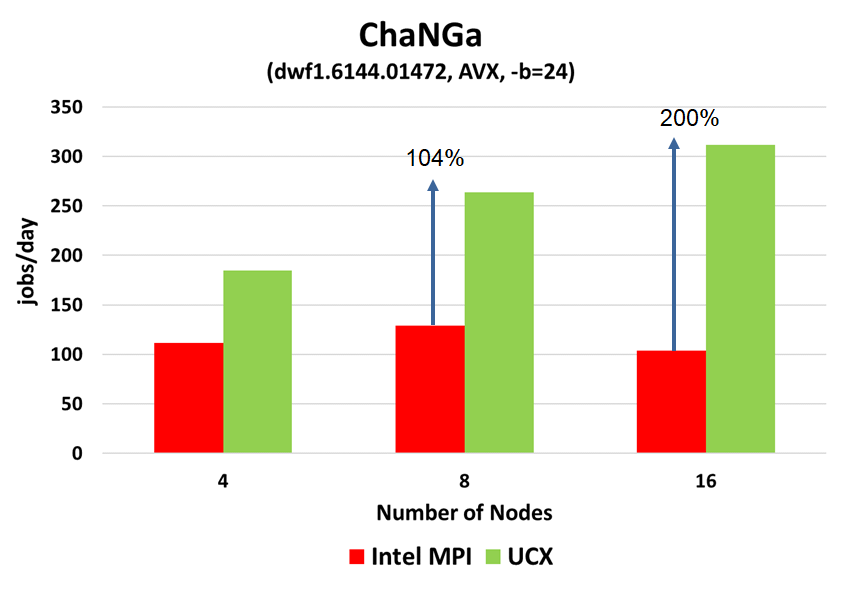
AVX enabled Performance plus Particles per Bucket Tuning on larger input
As Intel Skylake servers supports AVX, we changed the build to enable it.
In addition, runtime tuning was done to allow larger pacticles per bucket (using the -b argument). The default is 12, we enlarged it to 24 in this example.
In this example we compared two charm++ builds:
- UCX machine layer using the following build.
- ./build ChaNGa ucx-linux-x86_64 ompipmix icc ifort --enable-sse2 --enable-error-checking --with-production -j16
- MPI machine layer based on Intel MPI 2018
- $ ./build ChaNGa mpi-linux-x86_64 icc ifort --enable-sse2 --enable-error-checking --with-production -j16
The input that was used in this example is larger (dwf1.6144).
Run command:
./charmrun +p160 -x UCX_NET_DEVICES=mlx5_0:1 ./ChaNGa -b 24 ./dwf1.2048.param | grep Big | awk '{ SUM += $5} END { print "BigStepTime=" SUM }'
No additional tuning was done, see above for full build instructions.
Results
- ChaNGa using UCX Machine layer provides 104% higher performance at 4 nodes.
- In addition, UCX Machine layer provides 200% higher performance at 8 nodes
- Performance reduction demonstrated with Intel MPI beyond of 8 nodes